
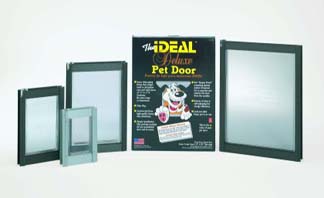
Ideal Deluxe Pet Doors
Aluminum Frame | Single Vinyl Flap
|
Information
|
|
Fits Doors
|
1/2" to 1 3/4" thick
|
|
|
The
Ideal Deluxe pet door is a highly rated utility pet door that is used in residential as well as commercial kennel situations. The flap is held in place by a magnetic strip at the base of the flap. These flaps are replaceable. The door comes standard with a closing security panel (thermoplastic plastic).
The aluminum frame Ideal Deluxe is commonly used for situations that only require a utility flap pet door for example; customers in moderate climates, for doors between the house and garage, porches, insulated storm doors, and lanais. Size super large 15 x 20 is available with the white frame color only.
|
Features
|
|
Aluminum frame
|
|
Flexible vinyl flap with magnetic strip along bottom
|
|
Slide in Plastic Locking Cover
|
|
Fits 1/2" to 1 3/4" thick
|
|
Flaps are replaceable
|
| |
 Pet / Size Recommendations Pet / Size Recommendations For the Ideal Deluxe Pet Doors Use the sizing tool to the left to match pet breeds with the various Ideal Deluxe Pet Door sizes.
Note: This tool is for reference only and does not guarantee a particular fit. Please see Measuring Your Pet for more detailed info. |
Note: For installation of the Ideal Deluxe Pet Door into walls see the Ideal Deluxe with Universal Wall Kit.
|
Video
|
Installation
|
How to
Replace Flaps
|
Need Flaps?
|
Get
Adobe Reader
|
|
|
|
|
|
|
|
Ideal Pet
Deluxe Pet Doors
|
(Comes with slide in locking panel)
|
Fits Doors
|
1/2" to 1 3/4" thick
|
|
|
|
 |
Size
Pet Opening
|
Rough-Cut
(wxh)
|
External Frame
dimensions
(wxh)
|
Prices
|
| |
|
Small
5"w x 7"h
|
5 7/16 x 9 1/4"
|
7 1/4 x 10 3/4"
|
N/A
|
| |
|
Medium
7"w x 11 1/4"h
|
7 1/4x 13 1/2"
|
9 1/4 x 14 3/4"
|
$67.99
|
| |
|
Ex-Large
10.5"w x 15"h
|
10 7/8 x 17 3/8"
|
12 3/4 x 18 5/8"
|
$79.99
|
| |
|
Super Large
15"w x 20"h
|
15 1/4 x 21 1/8"
|
17 1/8 x 23 1/8"
|
$101.99
|
 |
|
|

Basic Alum. Frame Door
4 Sizes
Doors: 1/2" - 1 3/4"
$69.99 - $126.99
 Pricing starts at: $69.99Complete pricing chart at bottom of this page
All Ideal Pet Product returns incur a 20% restocking fee
Ideal Pet Deluxe Pet Door
TOOLS REQUIRE FOR INSTALLATION:
Scissors . Hammer and Awl (or Nail) . Drill and 3/8 Bit . sabre Saw . Phillips Screwdriver
1. Determine template placement - Using scissors, cut template along dotted lines as indicated.
Center template (width) in middle of door; tape in place. Position the top of the template 2" taller than
your pet's shoulder.
Important: Under no circumstances should the bottom edge of the rough opening be less than 3" from
the bottom edge of the wood door.
2. Outline pet door opening - With template taped in place, use a pencil to draw around the inside
edge of template onto door. Use a nail or awl to mark inside edge corner holes and outer hardware drill
holes.
3. Drilling holes - Drill four 3/8" diameter individual holes (the inside edge corner locations will serve as
a guide). Next: Drill the 3/8" diameter outer door hardware holes.
4. Cutting the opening - Begin with one of the inside edge corner holes. Next: Using a sabre saw,
carefully cut along the pencil line.
5. Assembly & Adjustment (See Diagram 1) -
Insert outer frame (A) (no flap) into opening from
exterior side. Make certain frame is flush with door
surface. No adjustment is necessary if frame does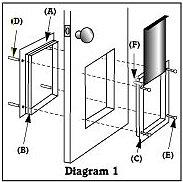
not extend beyond interior opening. If part of the
outer frame extends into interior, remove "break-off"
levels on outer frame (B) as required. Use
pliers to break off a single level at a time starting at
top, bottom then sides. Start at corner and bend
metal inward toward center in 2" intervals.
Caulking is recommended under outer frame.
Place inner frame (C) (with flap) into opening from
inside of door, hold in place, insert binder posts (D)
through exterior frame, then install screws (E) and
tighten until snug. Do not over-tighten. If screw
extended past outer edge of post, remove screw,
cut-off accordingly, then re-insert.
Note: Uneven Surfaced Doors:
If your door has an uneven surface, after cutting the rough opening, build up the lowest area with
wood frame thick enough to make an even door surface. If both sides of your door are uneven,
repeat the process for the other side.
Installation In Walls And Other Types Of Doors
The pet door can be installed in walls, steel doors and storm doors, however, additional materials such as
wood framing, plaster, touch-up paint, longer frame screws and additional tools may be required.
Walls: Once an opening has been made in a wall it will be necessary to build a frame to cover the exposed area
between wall surfaces. Use wood screws to attach interior and exterior frame to wall surfaces. When cutting
through walls, extreme caution must be used so as not to cut any concealed electrical wires, gas lines or water
pipes.
Steel Doors: To create an opening in a steel door use a jigsaw with a hacksaw blade to cut the opening
starting at pre-drilled corner holes.
Storm Doors with 1/2" or less: Starting at any pre-drilled corner hole, use tin snips to cut out rough
opening. Break off levels 1 & 2 (B) as required (See Diagram 1).
4 Sizes for Small to Large Dogs
Fits 1/2" - 1 3/4" Thick Doors | Single Flap
Aluminum Frame - Clear Flap


